This article has been verified for the release 15.1 on November 30, 2025.
YouTestMe seamlessly integrates with leading Learning Management Systems (LMS), enabling users to create and deliver exams directly from their LMS environment. Our Proctoring solution can also be embedded via SDK, ensuring that assessments conducted within the LMS are securely monitored and fully proctored.
This article provides a step-by-step guide to enabling LMS integration, along with instructions for using the YouTestMe Proctoring solution within your LMS.
Creating an integration
To create an LTI integration in the YouTestMe application:
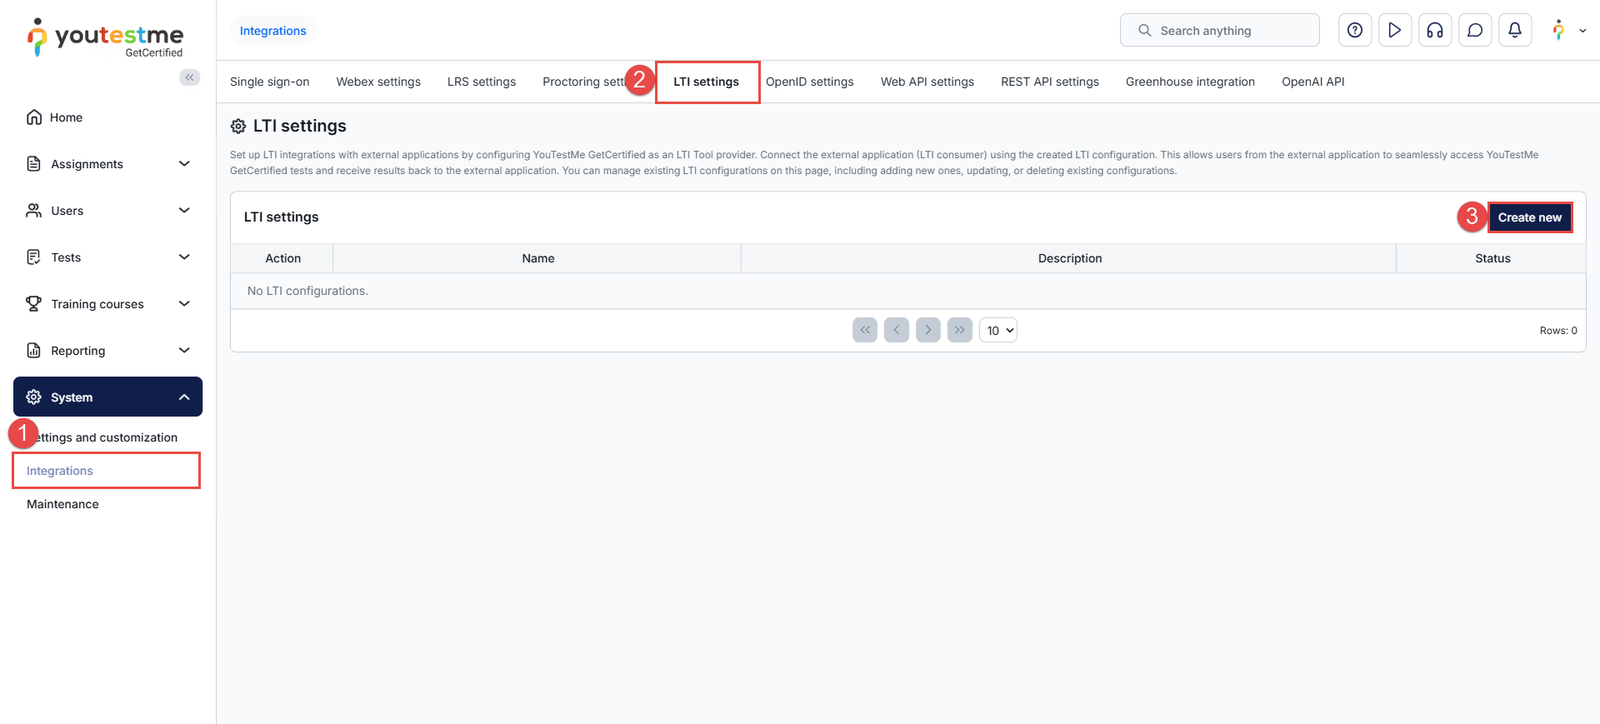
- Navigate to the “System” option in the left side menu, then choose “Integrations“.
- Navigate to the “LTI settings” tab.
- Click the “Create New” button.
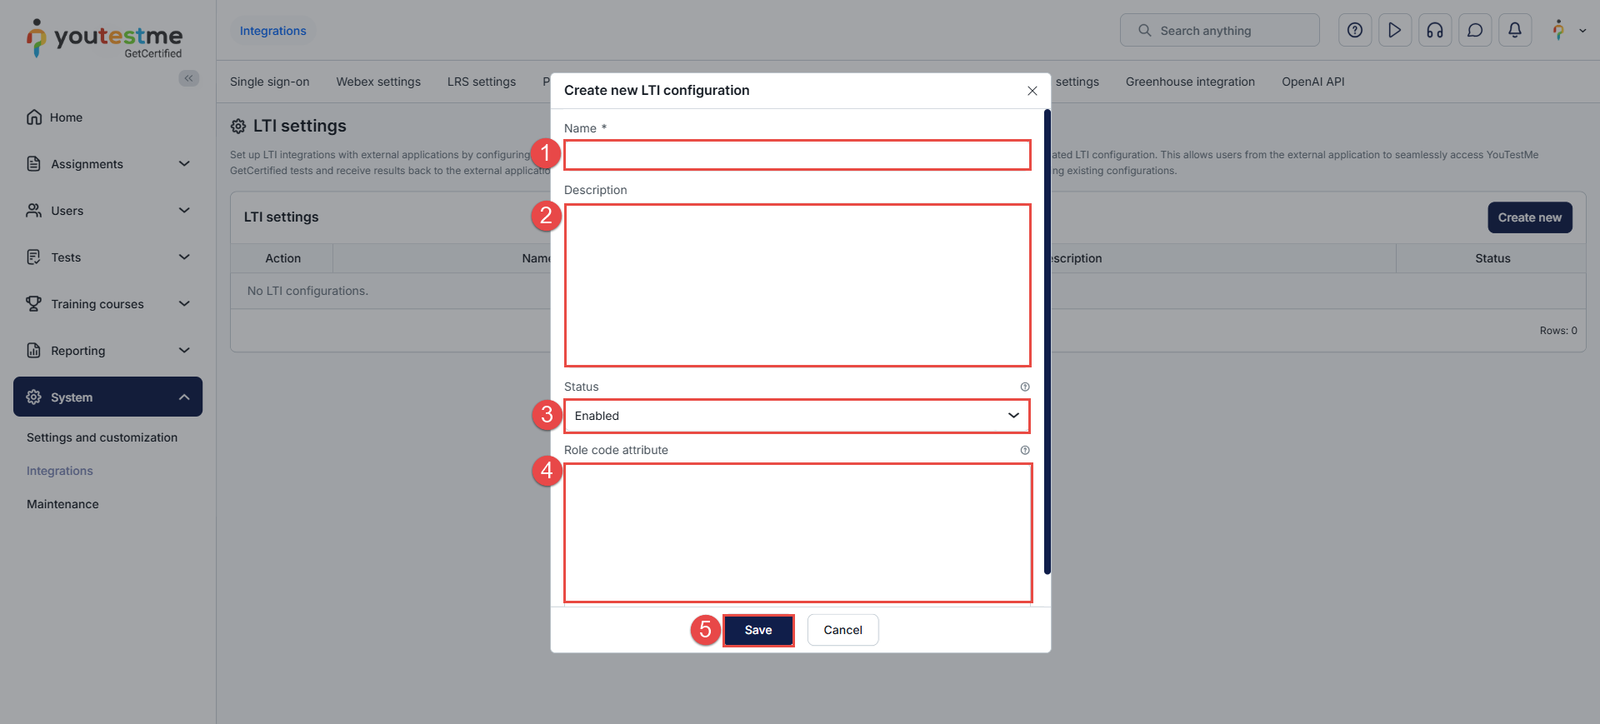
In the Create New LTI Configuration dialog:
- Enter an integration name.
- Optionally, enter a description.
- Select the status, either “Enabled” or “Disabled”, to control when the integration can be activated and used.
- Enter the value that should be mapped to the role code attribute.
- Click the “Save” button.
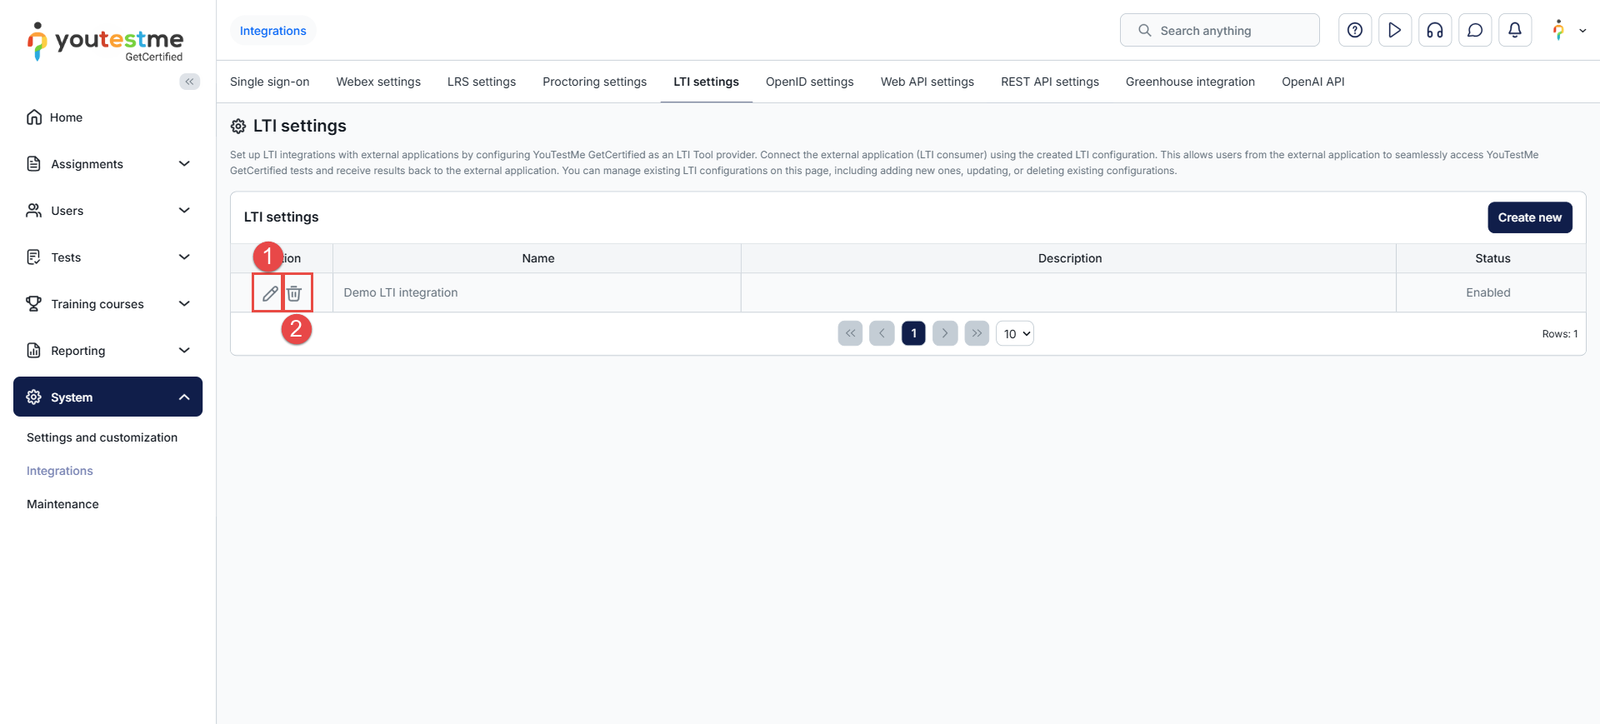
The newly created integration will appear in the LTI Settings table, where you can:
- Click the Edit button to copy the information required to configure the integration in your LMS, or to manage the integration’s status and details.
- Click the Delete button to delete the integration permanently.
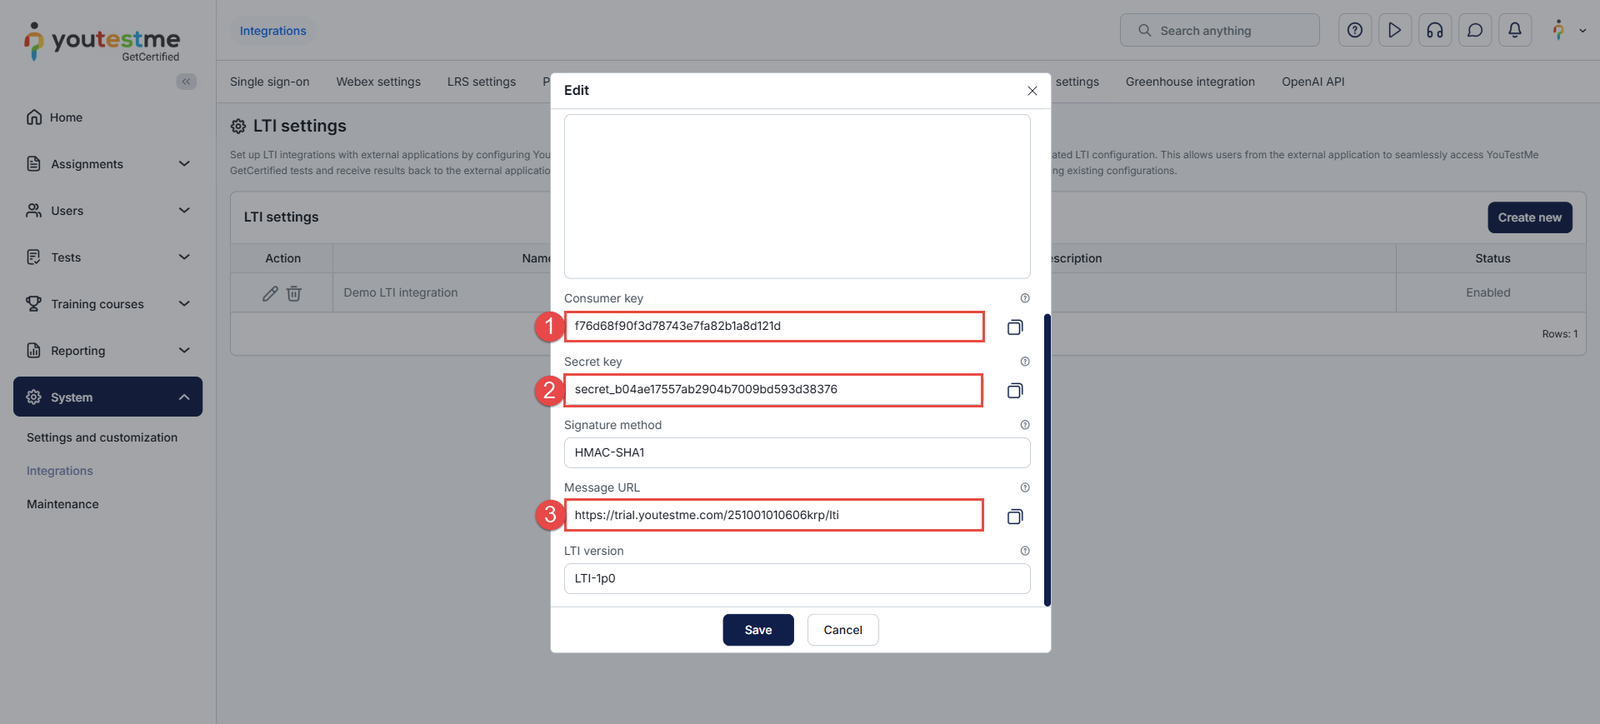
The data you will need is:
- Consumer key.
- Secret key.
- Message URL.
Creating a test
The next important step is to create a test.
You can check the following link if you need any help with the test creation.
Note: It is important to create active self-enrollment testing sessions and publish the test to allow test-taking through the LMS.
The key details you will need are the test ID and the testing session ID. These allow you to configure the integration either to assign candidates directly to a specific testing session or to grant them access to the test and let them choose the session in which they wish to begin.
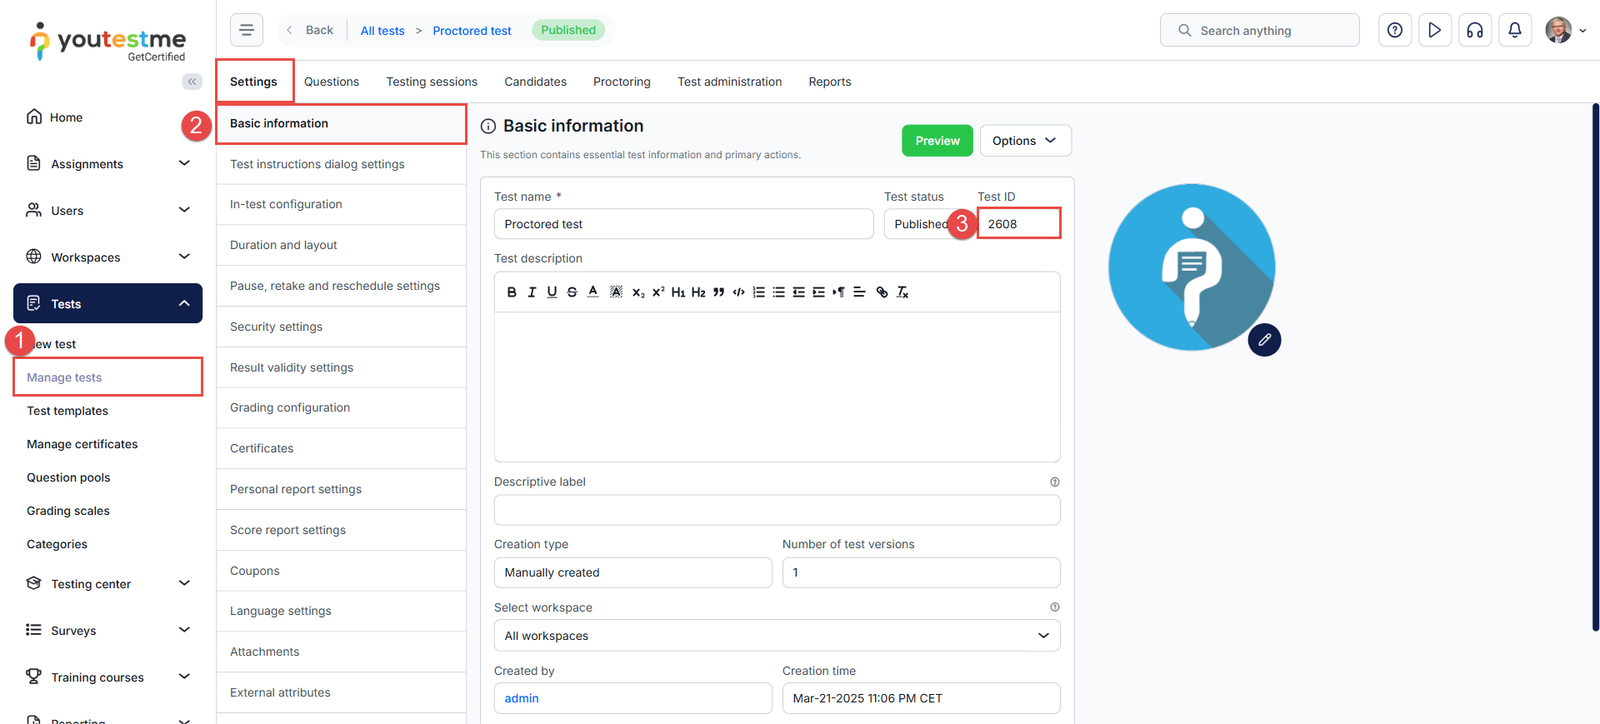
To copy the test ID:
- Access the desired test from the Manage Tests module.
- Navigate to the “Settings” tab and select “Basic Information“.
- The ID can be copied from the “Test ID” field.
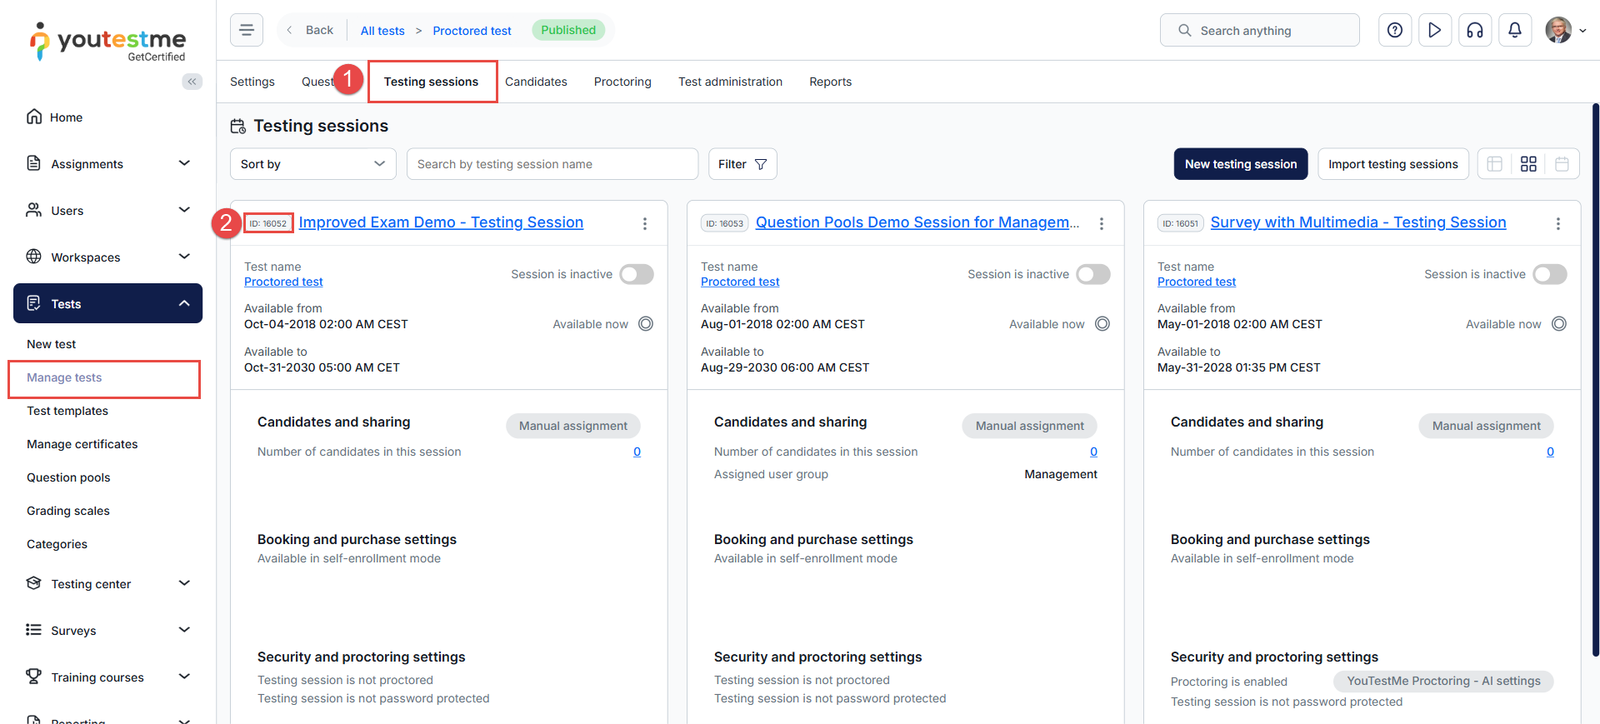
To copy the testing session ID:
- Navigate to the Testing Sessions tab.
- The ID is located in the top-left corner of the testing session card.
More information on how to set both integration settings is provided below.
LMS Configuration
For the demonstration, LMS Emulator will be used.
- Access https://saltire.lti.app/platform.
- Navigate to the “Security Model” tab.
- In the “Message URL” field, enter the “Message URL” text from the YouTestMe application.
- In the “Consumer key” field, enter the “Consumer key” text from the YouTestMe application.
- In the “Shared secret” field, enter the “Secret key” text from the YouTestMe application.
- Click the “Save” button on the top left corner.

Allow access to the test
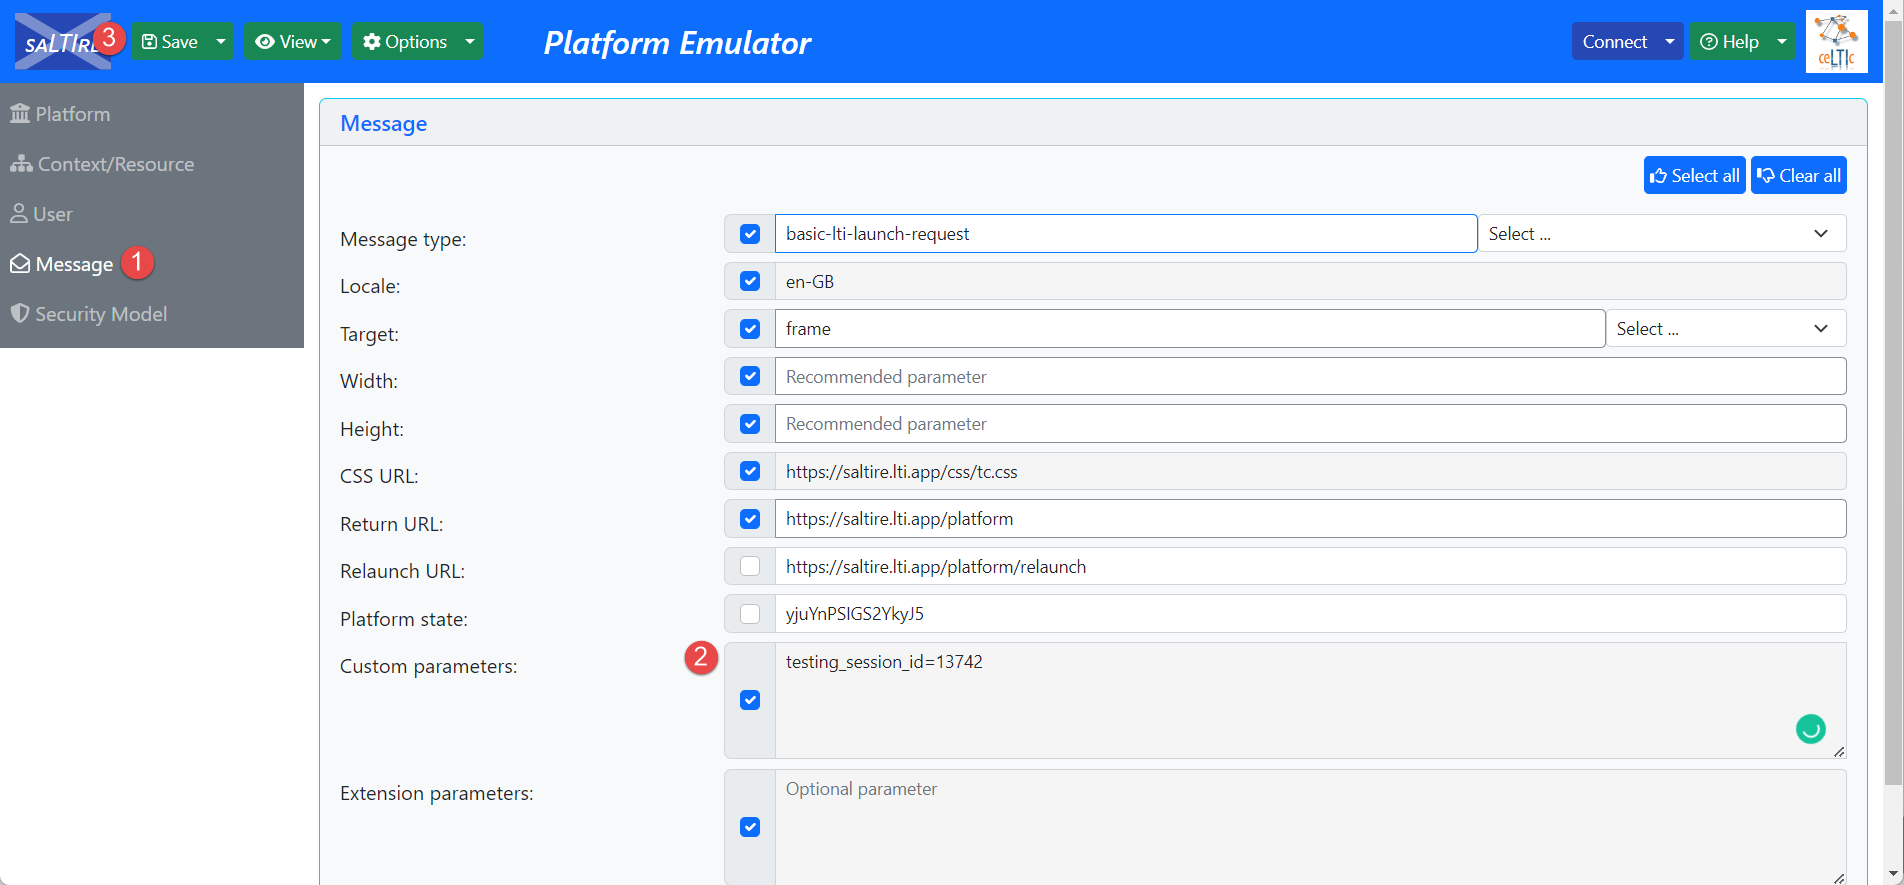
To give candidates access to the test where they can choose in which testing session they want to start the test you should do the following:
- Navigate to the “Message” tab.
- In the “Custom parameters” field, enter the test_id=desired_test_id.
- Click the “Save” button.

Once the integration is set, a candidate can start the test. To start the test, click the “Connect” button in the top left corner.

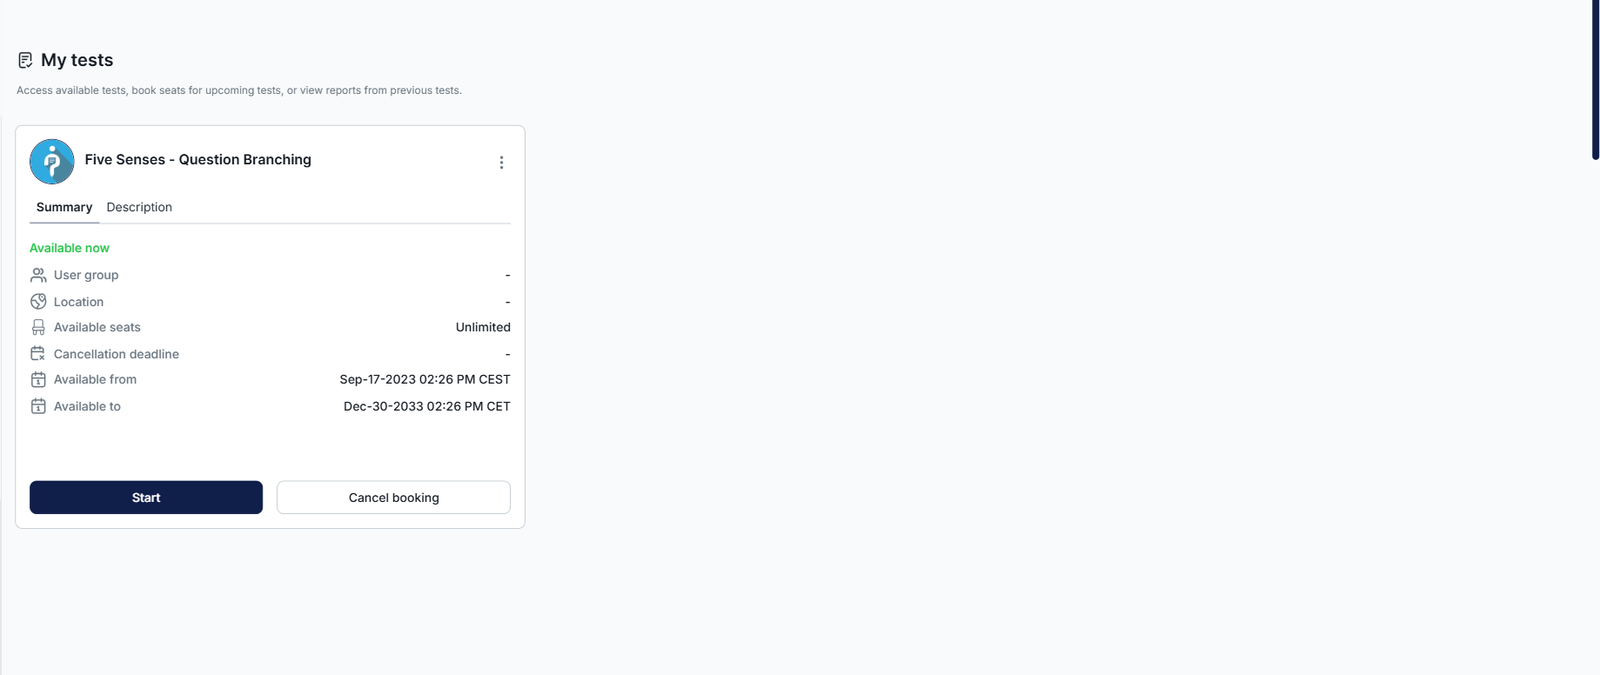
The candidate will be redirected to the YouTestMe application, where they can start the test. If there are multiple testing sessions, the candidate should click the “Choose the session” button to select the desired session to start the test. Otherwise, the candidate should only click the “Book” button to book the available session if a booking deadline is defined, or the “Start” button to start the exam.
Once the test is completed, the candidate may be redirected to the personal report (depending on the test settings). Once checked, the candidate can sign out by clicking the button in the top-right corner.

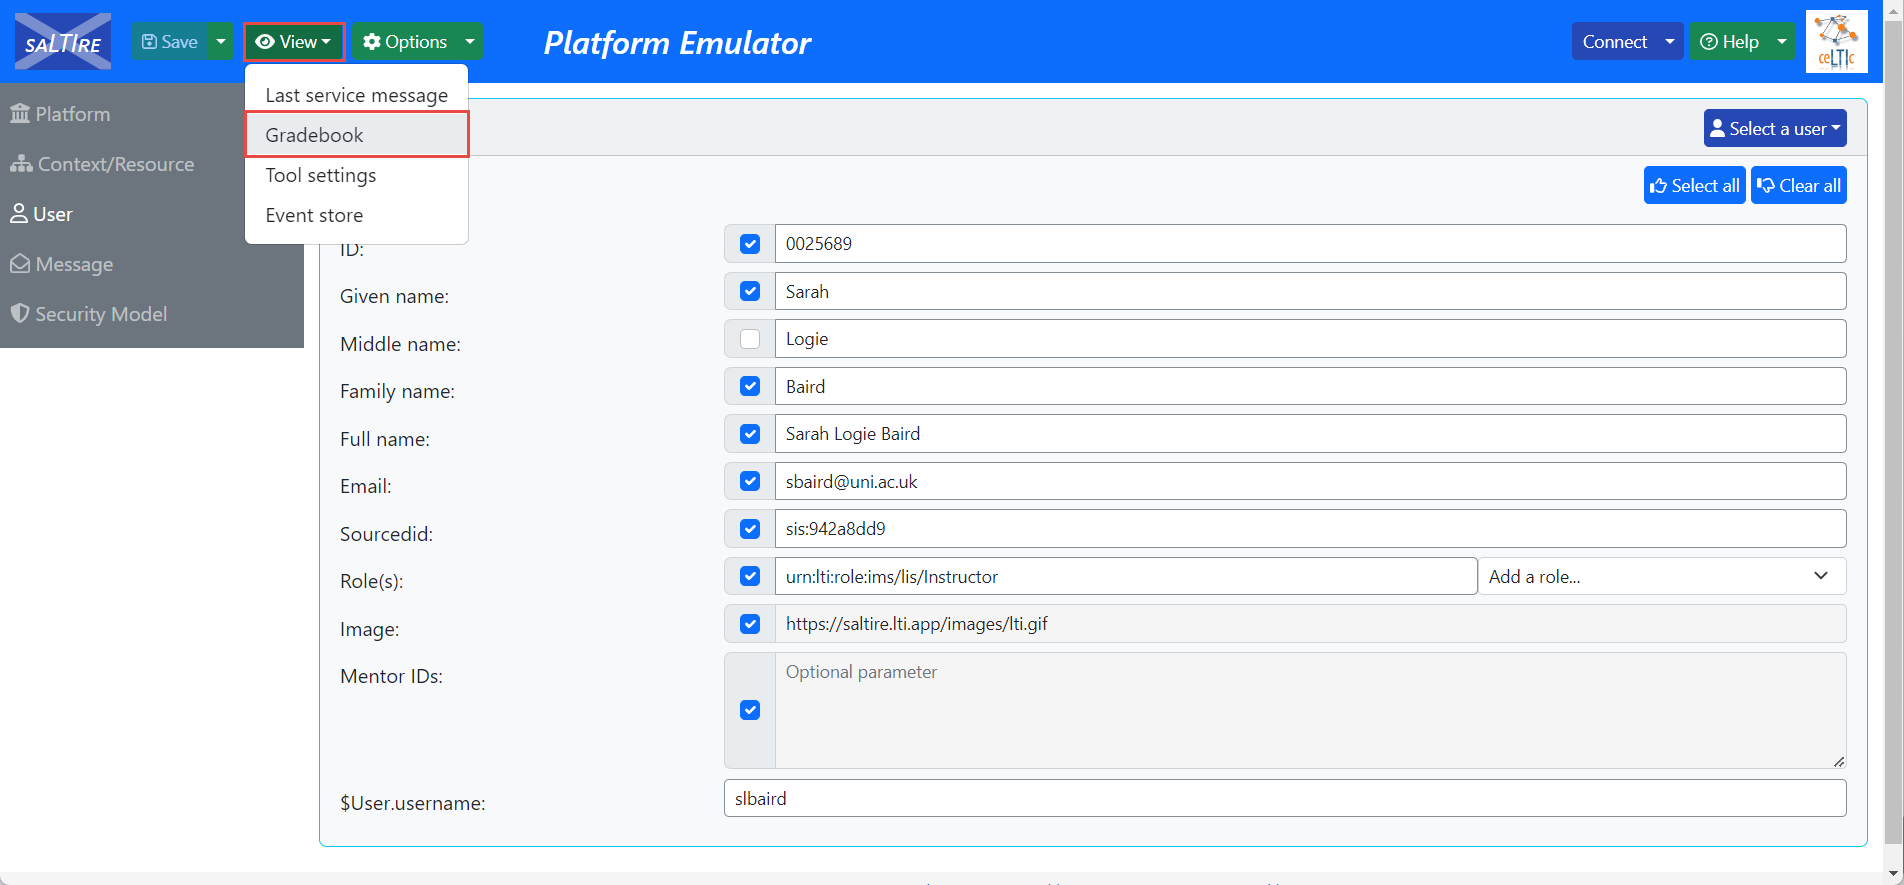
Once signed out, the candidate will be redirected to the LMS page.
The candidate can access their report by clicking the “View” button, then “Gradebook”.
Allow access to the testing session directly
To give candidates access to the testing session directly, you should do the following:
- Navigate to the “Message” tab.
- In the “Custom parameters” field, enter the testng_session_id=desired_testing_session_id.
- Click the “Save” button.
Once the integration is set, a candidate can start the test. To start the test, click the “Connect” button in the top left corner.

The candidate will be redirected to the YouTestMe application, where they can start the test. Since the candidate has already been assigned to the testing session, they will have the “Start” button. The rest of the process is the same as for the first scenario.
Integrating the YouTestMe Proctoring Dashboard via SDK and Deep Links
YouTestMe Proctoring can be seamlessly integrated into your environment using our SDK. To embed the session supervision dashboard, please refer to Chapter 4 of the SDK documentation.
The dashboard can be accessed through a deep link structured as: https://proctor-demo.youtestme.ca/api/auth/jwt?token= <JWT>.
- Replace <JWT> with a signed token containing the following payload: { “username”: “proctor_username”, “role”: “proctor”, “identifier”: “session_identifier” }
- Replace https://proctor-demo.youtestme.ca with your own proctoring environment URL.
This link automatically creates the proctor’s account and logs the user into the proctoring application. The identifier parameter is optional; omitting it opens the dashboard displaying all sessions assigned to the proctor, while providing it directs the proctor to the specific session.
To define proctors for a session, follow Chapter 3.2 and add their usernames to the invites array in the JWT passed to Supervisor.
There is no need to pre-create accounts; they are generated automatically when the deep link is accessed.