Article verified for Release 15.0 on September 9, 2025
This article explains how to customize Personal Report Settings for a specific test. You’ll learn how to tailor the content visible to candidates when they view their report and manage system-wide preferences, such as the display of the pass/fail labels and animation.
Accessing the Desired Test
To configure personal report settings for a specific test:
- Navigate to the Tests module from the main menu and select Manage Tests.
- Click on the desired test name to access its settings.
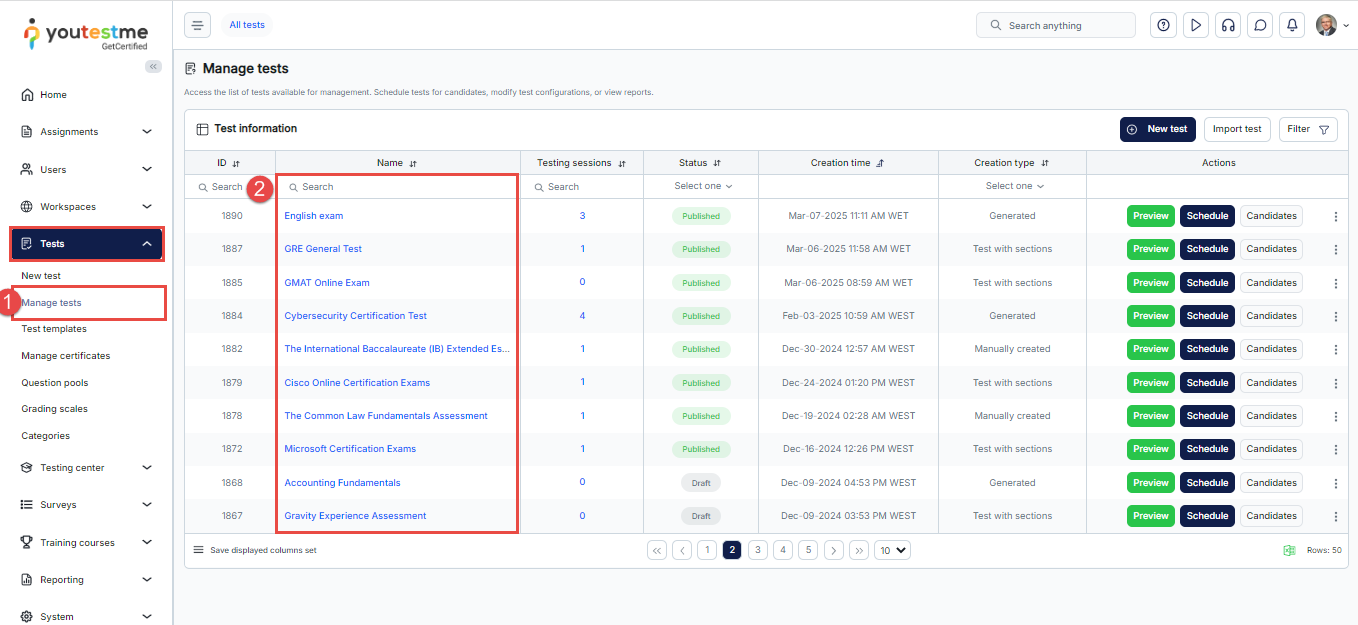
- In the Settings tab, select the Personal Report Settings section.

Personal Report Settings
Personal Report Settings allow you to control the content and accessibility of the test report presented to candidates. You can customize the information displayed, define when the report becomes available, and set the duration for which candidates can access it.
Note: These settings apply exclusively to the candidate’s view of the report. Test Managers retain full access to the complete report and all associated data.
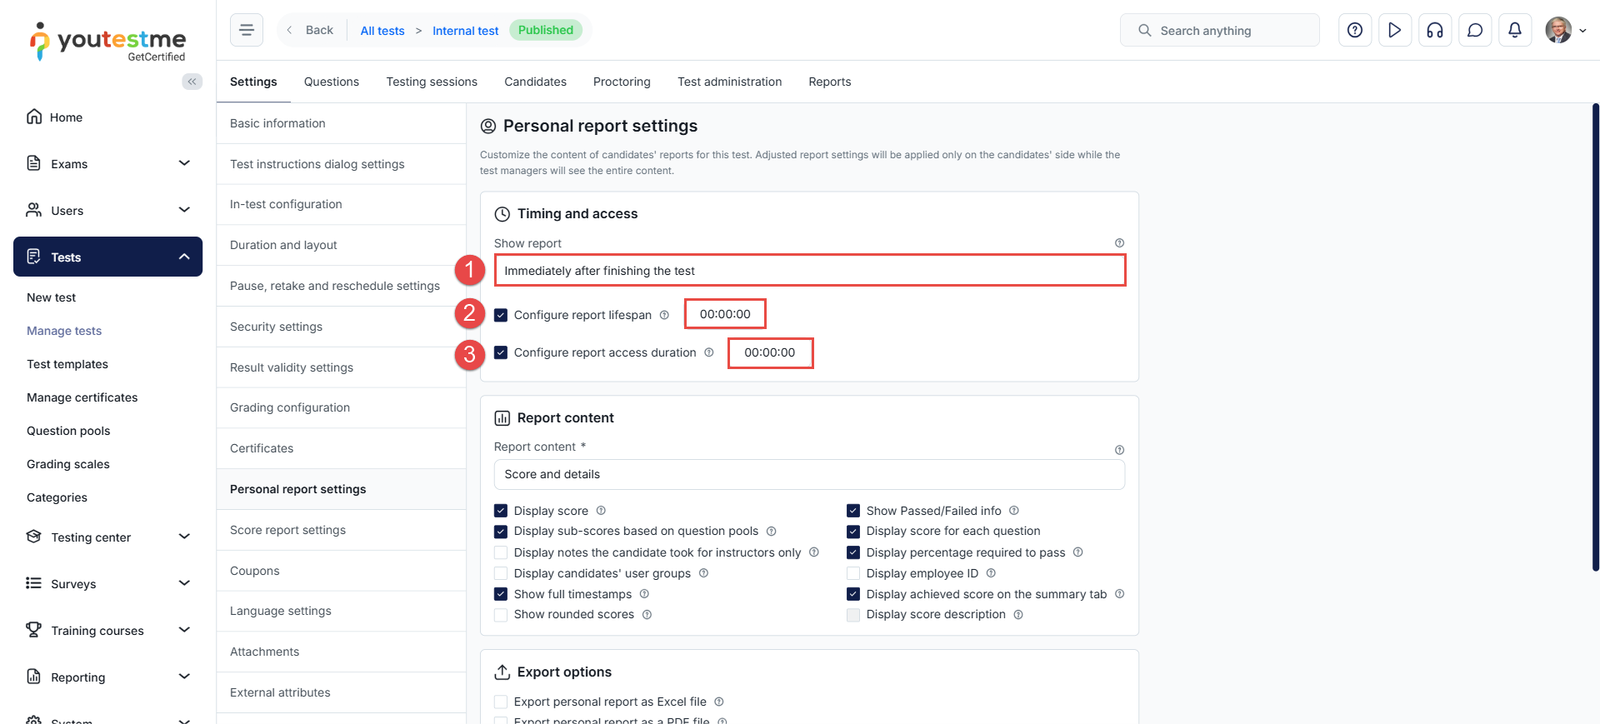
Timing and access
To customize the personal report timing and access settings, follow the instructions below:
- Show report: Choose when the report should become visible to the candidate. The available options are:
- Immediately After Finishing the Test – Candidates will see the report. However, some questions may not be graded.
- Immediately After Grading – Candidates will be able to view the report once the test manager has finished grading all questions that require manual evaluation. Additionally, if a positive proctoring report is needed, the proctor’s grades must be finalized to resolve the report. The report will be available immediately if there are no questions requiring grading.
- Immediately After Result Verification – Candidates will view the report after the test manager verifies their test attempt. Once verified, no further changes to the test results will be possible. Please refer to this article for more details about results verification.
- Upon Manager’s Approval – Candidates will access the report after the test manager has approved it. The approval can be done collectively for all candidates or individually for each candidate.
- Real-time grading – Candidates will observe score updates in real-time during the test-taking process, with changes reflected after submitting each answer.
Note: Some question types, such as essays, require manual grading by an instructor. Therefore, the results of tests containing this type of question cannot be immediately displayed.
- Configure report lifespan: Specify the timeframe during which the question details will be visible to the candidate upon opening the report. The system will periodically check the defined time, and if the candidate’s report is still open, the system will automatically hide the details after the defined period expires. For further guidance, please read this article: How to Set a Personal Report Lifespan.
- Configure report access duration: Candidates can view their report for a defined period after completing the test, regardless of whether they accessed it immediately or at a later time. The system will periodically check the elapsed time, and if the candidate’s report is still open after this period, it will automatically redirect them to their profile page.
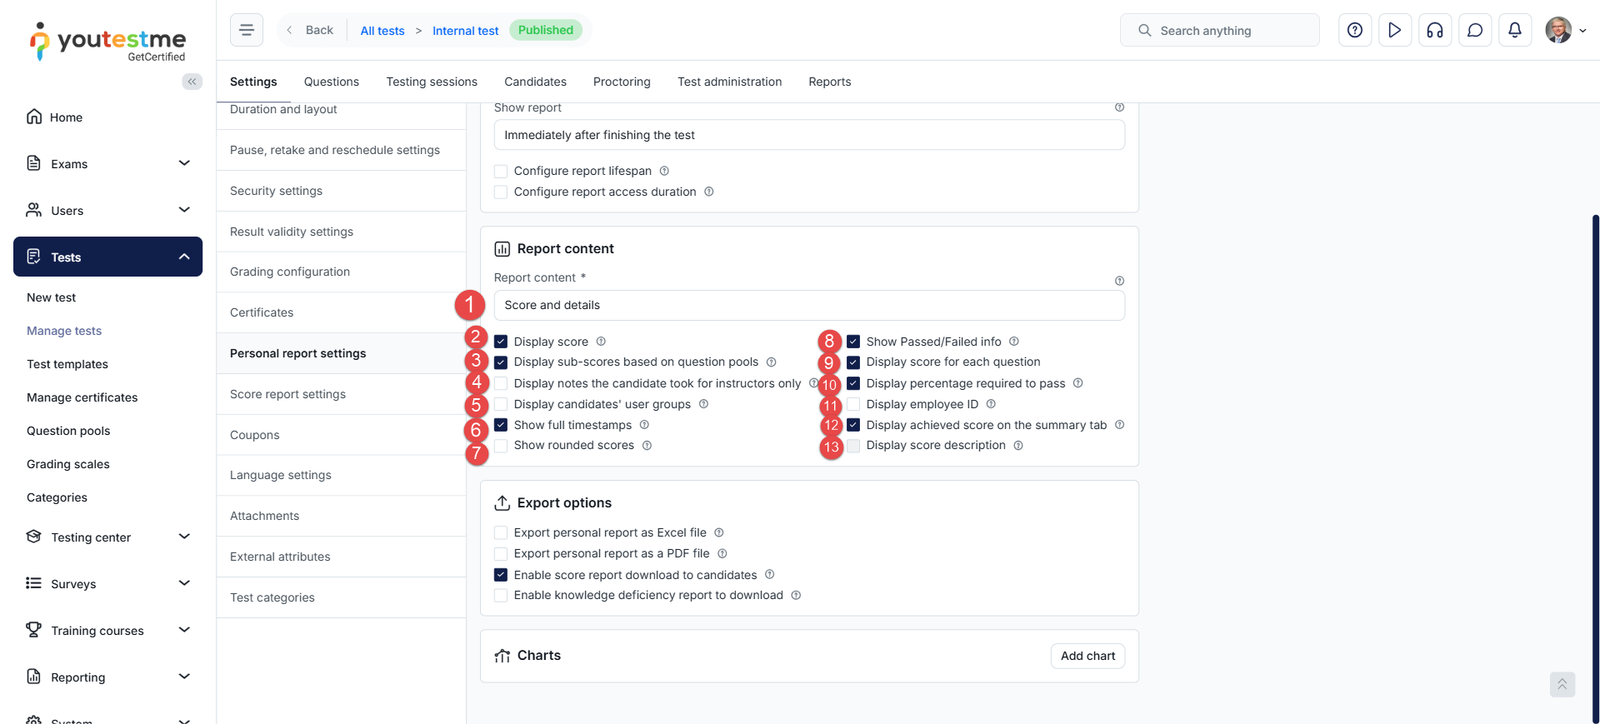
Report Content
In this section of the personal report settings, you can define the report content:
- Choose the level of detail displayed in the report:
- Score Only – Shows only the overall score in the summary report page.
- Score and Details – Displays the score along with candidate responses and the correct answers for each question.
- Display Score: Enabling this option displays the achieved score in points or as a percentage in the personal report. If this option is not activated, the Export personal report as Excel file and Export personal report as a PDF file options cannot be enabled.
- Display sub-scores based on question pools: Provide a detailed breakdown of the candidate’s performance across different question pools and test sections (for tests with sections), offering greater insight into their strengths and weaknesses on a separate tab titled Aggregated Report.
- Display Notes the Candidate Took For Instructors Only: Make the candidate’s notes taken during the test persistent. The notes the candidate took for each question will be displayed in a separate tab titled Notes, which is visible only to the test instructors.
- Display Candidates’ User Groups: Show the user groups to which the candidate belongs.
- Show Full Timestamps: Show the date and the time of day. If disabled, only the date is shown.
- Show Rounded Scores: Show scores rounded to the closest whole number. Otherwise, the scores are displayed with 2 decimal digits.
Note: Passing logic still uses precise (non-rounded) values. - Show Passed/Failed info: Display whether the candidate has passed or failed the test, based on the defined passing criteria.
- Display Score for Each Question: Show the individual score obtained for every question. If this option is not activated, the Export personal report as Excel file and Export personal report as a PDF file options cannot be enabled.
- Display Percentage Required to Pass: Display the minimum percentage required to pass the test.
- Display Employee ID: Show the candidate’s employee ID beneath their username.
- Display Achieved Score on the Summary Tab: Include the score (points and percentage) in the test summary tab.
- Display Score Description: Display contextual feedback messages based on the candidate’s result. Requires the Display score and Show Passed/Failed info options to be disabled.
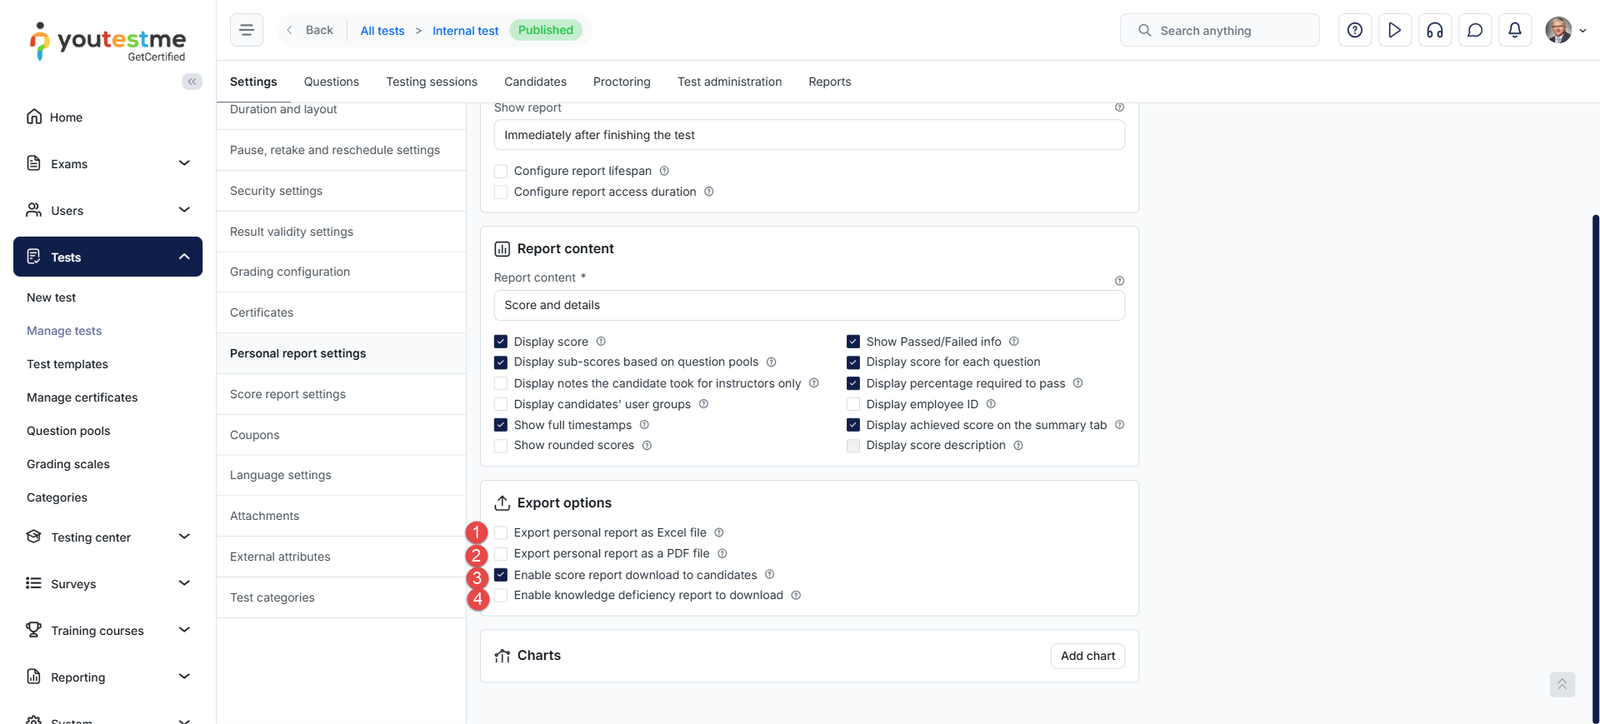
Export Options
In this section, you can select the reports that the candidate can download from their personal report:
- Export personal report as Excel – If you select both the Display score and Display score for each question options, the Excel export option will be automatically enabled and checked by default. You can uncheck the option if you prefer not to allow the export of the candidate’s report in Excel format.
- Export personal report as PDF – If you select both the Display score and Display score for each question option, the PDF export option will be automatically enabled and checked by default. You can uncheck the option if you prefer not to allow the export of the candidate’s report in Excel format.
- Enable score report download to candidates: The score report represents an upgraded iteration of the personal report. When this option is enabled, candidates can download their score report directly from their personal report.
- Enable knowledge deficiency report to download: Candidates can download the knowledge deficiency report from their personal report. The report will display a list of question pools from which the candidate answered at least one question incorrectly. The report will show the lowest level of the question pools (sub-pools). The question pools will be arranged in alphabetical order and will not be divided into sections, if any. For more details, please read this article: How to Enable Knowledge Deficiency Report Download.
Note: To make the Export personal report as Excel and Export personal report as PDF options available to candidates, the Score and details option must be enabled under Report content.
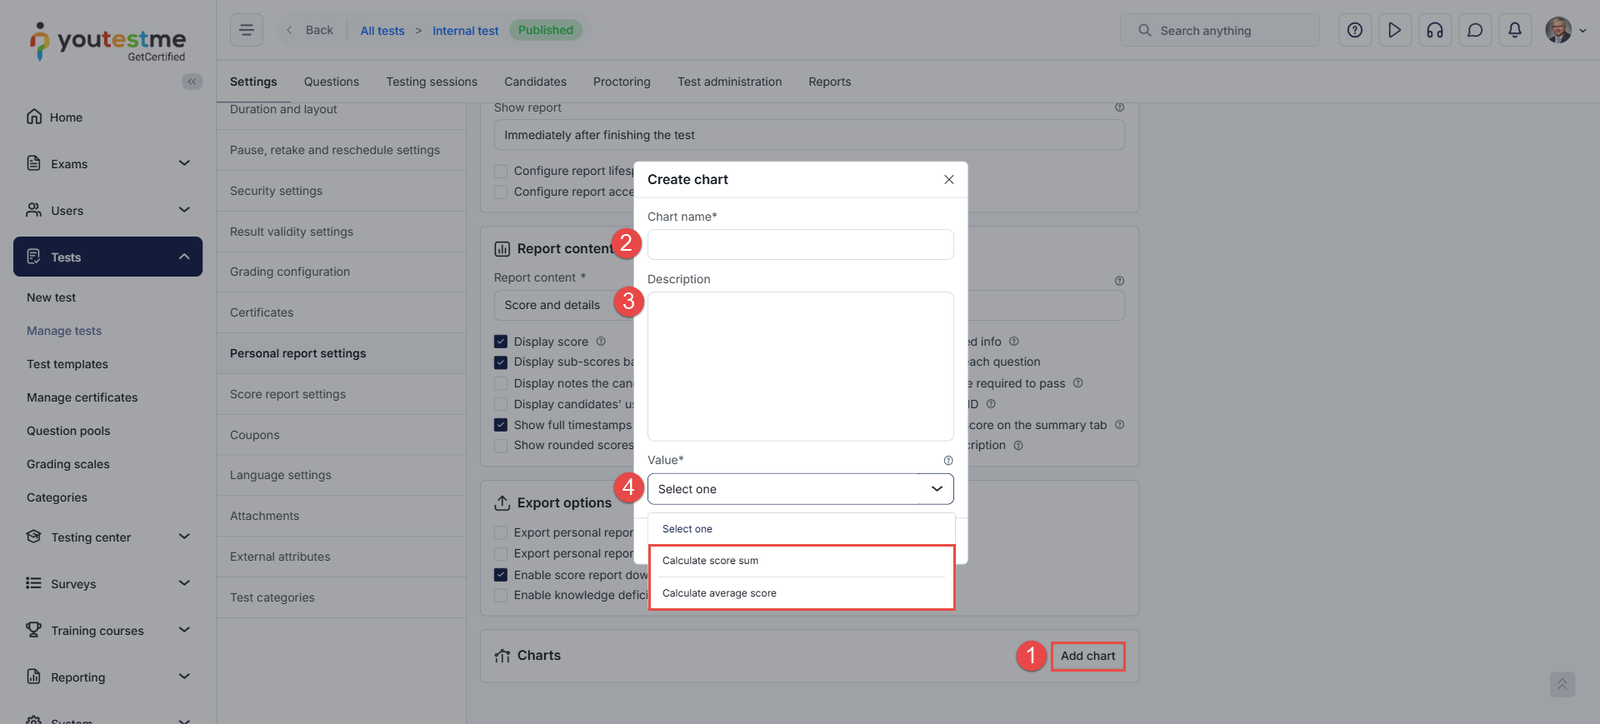
Charts
You can add charts to give candidates access to comparative and analytical data visualizations created from their total or average scores.
To add a chart, follow the steps below:
- Click the Add Chart button
- Enter the chart name
- Optionally enter a description
- Select the value, which can be the score sum or average, and click Save.
Personal Report Advanced Settings
In the System Settings and Customization, you can modify personal report settings that will be applied to all tests. This includes the options to:
- Hide the personal report animation
- Hide the Pass/Fail labels.
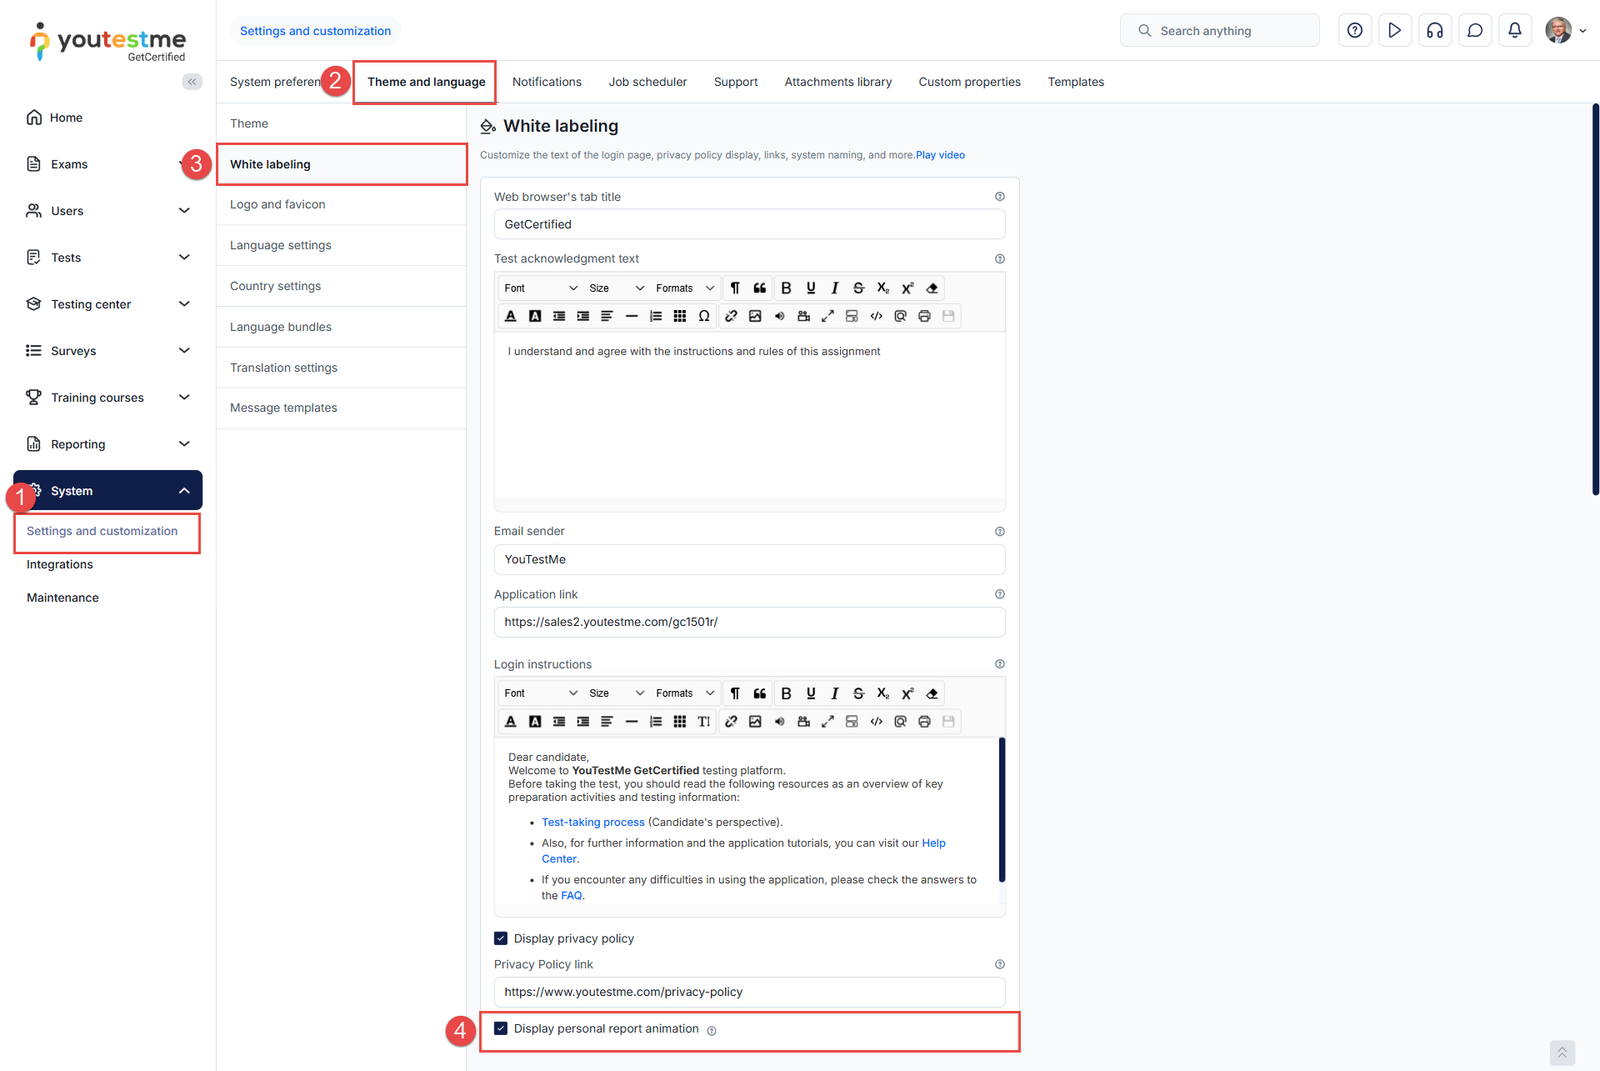
Hiding the Personal Report Animation
- Navigate to System and select the System and Customization module.
- Navigate to the Theme and Language tab.
- Select the White labeling tab.
- Click the box to enable or disable the option to display personal report animation.
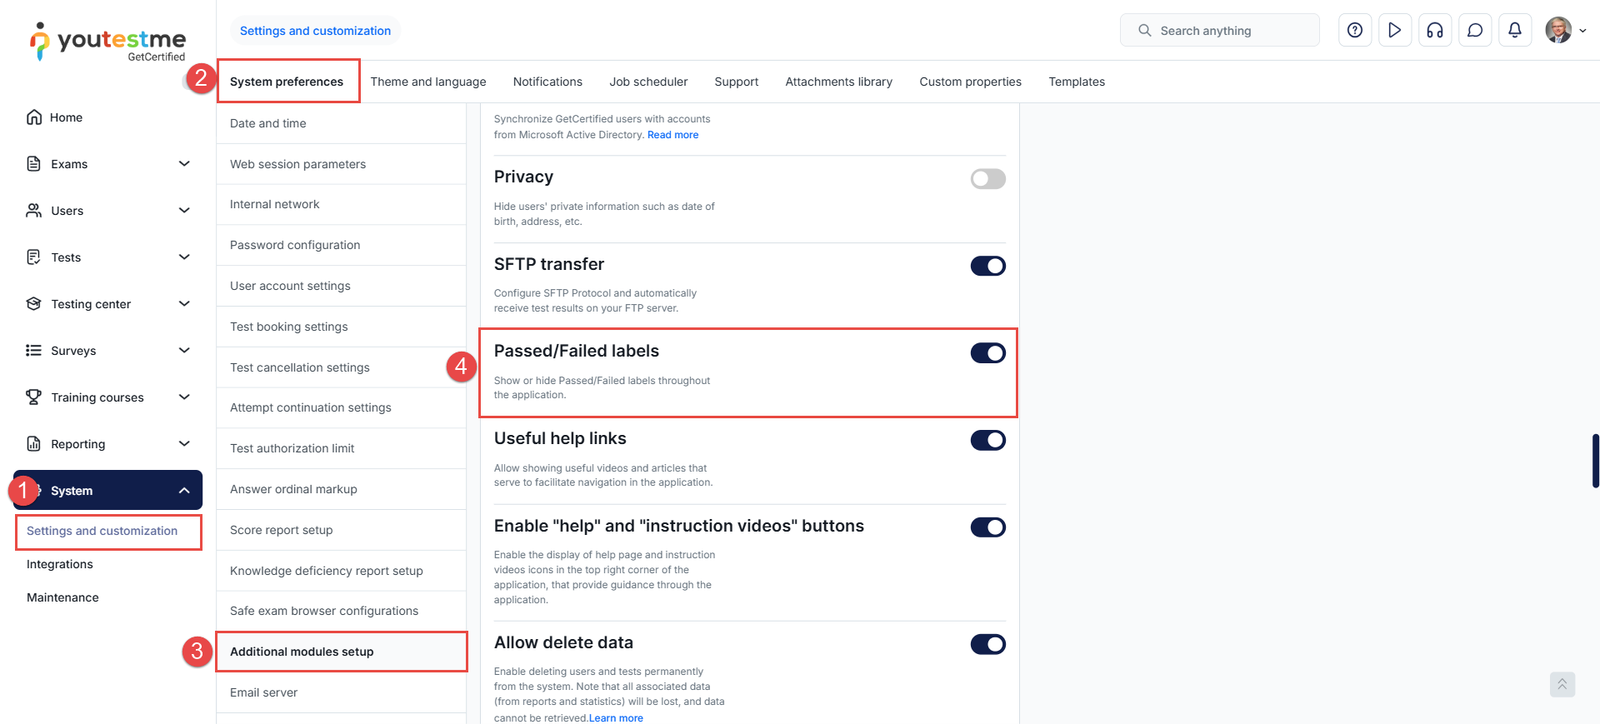
Hiding the Pass/Fail labels
You can hide the Pass and Fail labels, allowing candidates to see only their score or just the grades they achieved. To hide the pass and fail labels, follow the steps below:
- Navigate to System and select the System and Customization module.
- Navigate to the System Preferences tab.
- Select the Additional Modules setup option.
- Toggle the button next to the Passed/Failed label.
Candidate’s perspective
The image below displays the Personal report with all features described in this article enabled. Please visit this article to explore all the possible reports that can be generated by adjusting these settings.

For more useful instructional materials, please visit: